Tag Archives: food

Steak and potato and other basics

15 May

IMG_0401

It occurred to me after I wrote the post about wild boar that maybe I should go back to basics a bit and talk about meat in general. Also I had in my freezer a bone-in New York strip steak that weighed just over a pound.

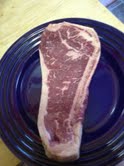
Figuring out what a good steak looks like is fairly simple. For example, this is a decent steak, it has nice, tight marbling, it’s meaty, the fat is trimmed but it’s still on there (Remember people: Fat is flavor.)  Marbling by the way are thin fibers of fat that run through a cut of meat, the more delicate the marbling, the more buttery and delicious the flavor.  Oh, also, select is the lowest grade, then you have choice, and prime. Because my mom owns a meat market, I don’t often eat anything but prime. But the average person can get a good choice steak and it will be delicious. Just be aware of this, so when steak goes on sale and some insanely cheap price like $3.99 a pound, know you’re probably getting the lowest quality. There’s no such thing as free lunch and all that jazz.

0-1

I don’t have a grill, or a backyard for that matter, so I have to get creative about how to cook steak. My mom bought me a cast iron grill pan and I recommend it for anyone lacking in the outdoor department. If a steak is good, it doesn’t need much. A little salt, a little pepper, rub a handful of olive oil on there and that’s it. I have this spice, called Chicago steak and chop and it’s ace but not sure it’s sold everywhere.

I prefer my steak rare, or medium rare at best. Ok so, this applies for a grill or a grill pan, either one: Get it hot. You know it’s hot when you flick water onto it and it sizzles. With an 1.5-inch steak, my mom said that it would take about 7 minutes per side. . For a more well-cooked steak, try 8-10 minutes. Don’t screw around with it when it’s on the grill, let it sizzle on a side and then flip it over. That way you can get nice grill marks. Let it rest for a few minutes after you cook it, maybe while you’re making the double-bakes below.

IMG_0399

I also made a quick double-baked potato for dinner, which is another one of those staples that tends to escape people. It’s super easy. You rub olive oil and salt on an Idaho potato and bake it for an hour. Then take it out and slice it in half, and scoop out the potato innards. By the way it will be H-O-T so be careful.

IMG_0400

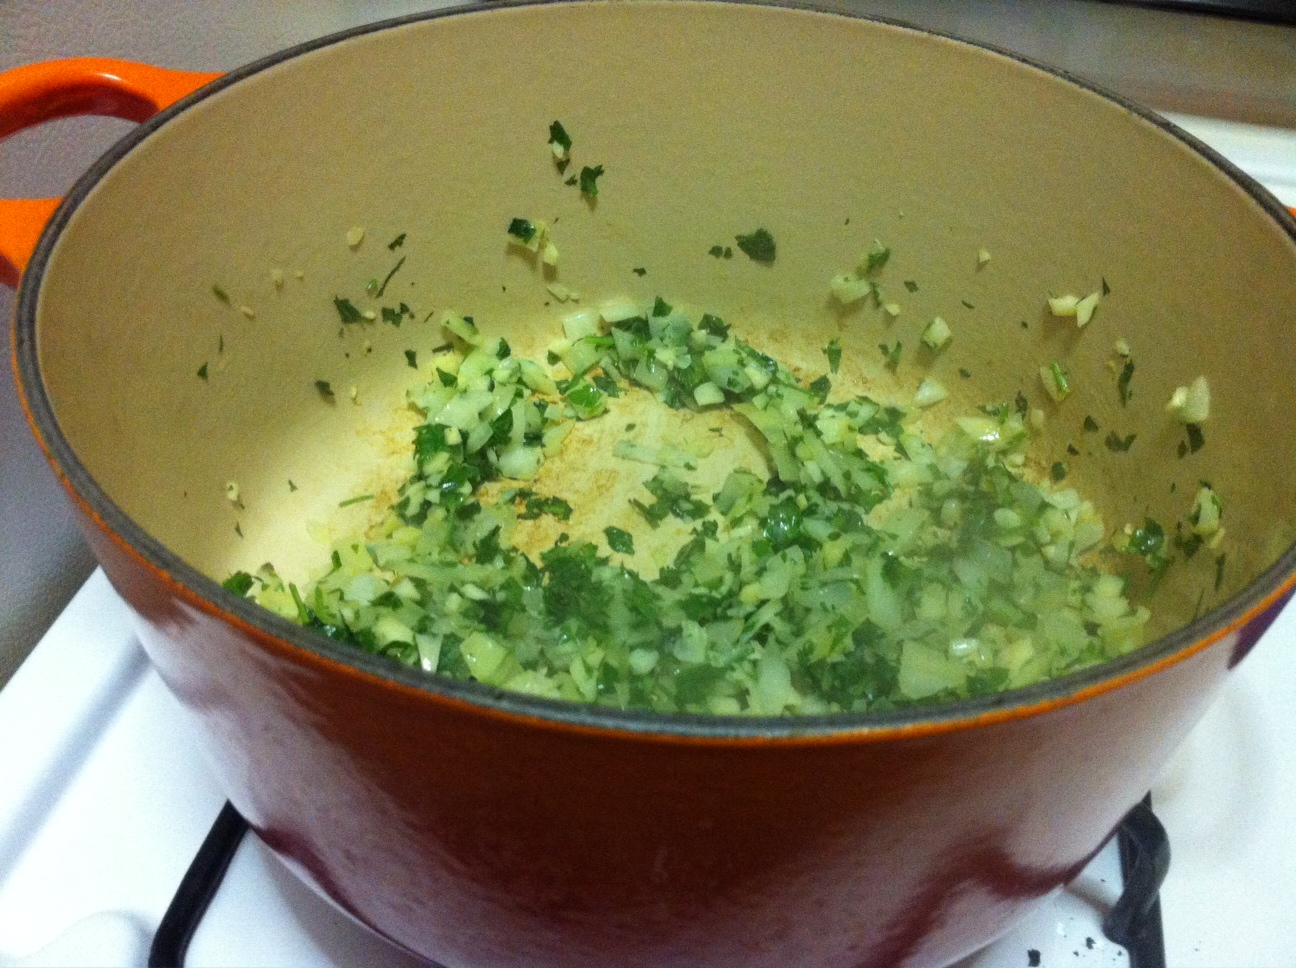
Ok so then, throw the innards in a bowl with two splashes of milk, salt, pepper, and small chunk of butter. Throw in two handfuls of grated sharp cheddar cheese, and a handful of diced chives or scallion. Mix this up and then scoop it back into the potato, and stick it in the oven again for just as long as it takes you to slice the steak. That way the cheese is full melty goodness.

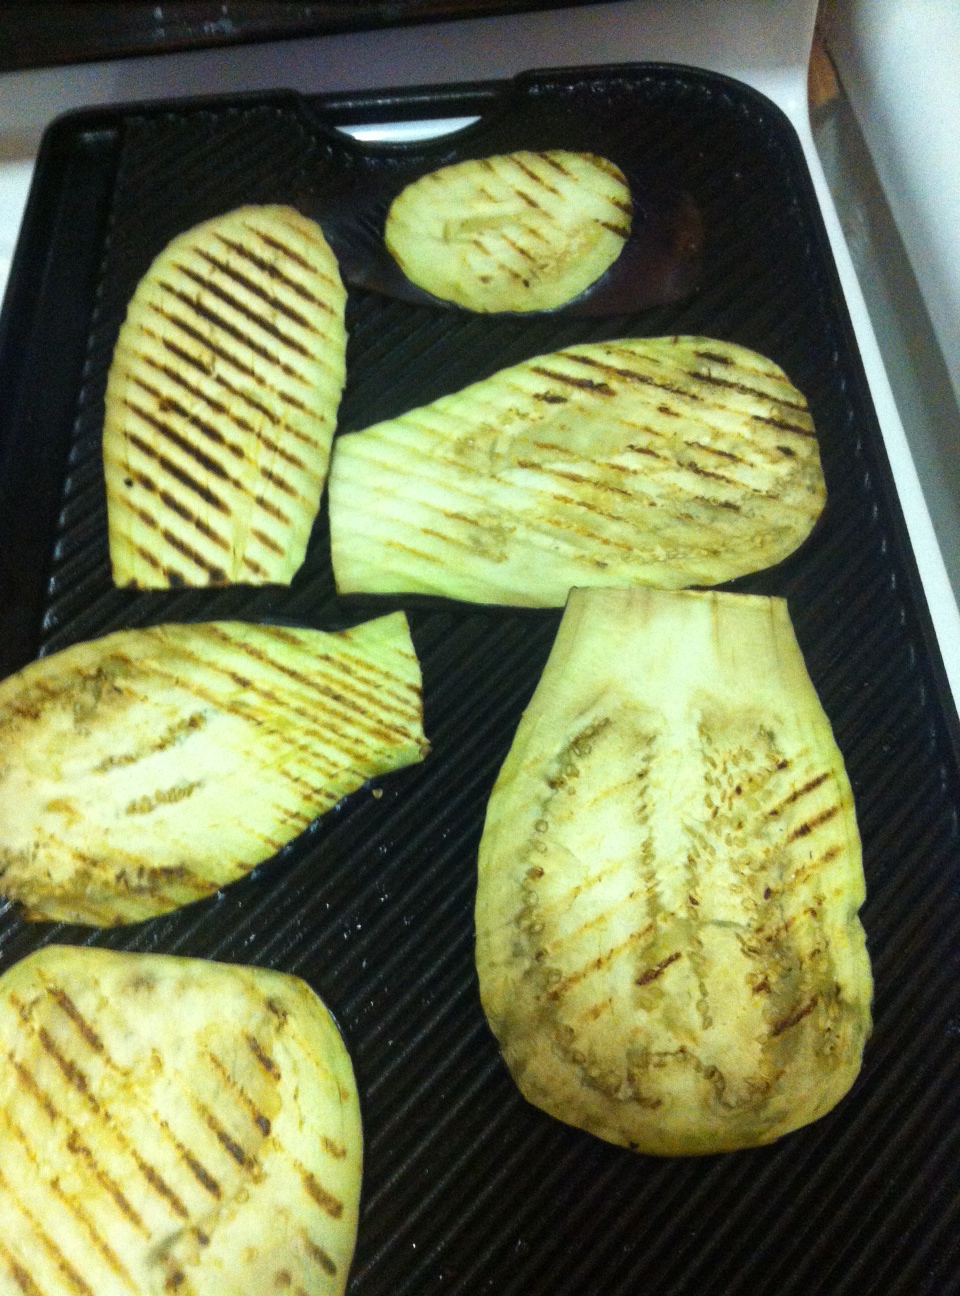
I also roasted some asparagus with just a hint of olive oil and a dash of salt.

IMG_0404

Grilled (not fried) eggplant parmesan

23 Jan

Hello out there. I’ve been desperately remiss here about posting, and it’s not because I haven’t asked my mom for advice.

So I am attempting to start anew, and I have just the thing, because I just ate it and it was really good: grilled, not fried, eggplant parmesan.

photo (12)

What you will need:

2 eggplants

2 large balls of fresh mozzarella cheese, salted

fresh grated parmesan

1 large can (I think 16 oz?) crushed tomatoes

1 regular 8 oz can tomato puree

1 pound ground beef

4 cloves garlic

1 bunch parsley

1 onion

olive oil

1 sauce pan

1 saute pan

1 oven pan, 9-13 or something like it.

O.k. so, slice the eggplant long ways in half, and then thinly.

photo (13)

Set aside.

Brown 1 pound of ground beef in a saute pan, then drain grease and set aside.

Dice parsley, olive and onion, and add to sauce pan with olive oil.

photo (15)

Toss the ground beef in the pan, then add the canned tomatoes, and about 1/2 can of water per can of tomato. Salt and pepper to taste. Stir. Let it boil, then simmer for about 20 minutes.

Meanwhile. If you have a grill, do this on the grill, if you have a grill pan, do it on the grill pan. Brush a thin layer of olive oil over the eggplant, (seriously, thin, you shouldn’t drench it) and grill them so they are soft in the middle.

photo (16)

This process took me about 20 minutes. After I was done, I added about four fistfulls of cheese to the quick red sauce and turned that off.

photo (14)

Slice the fresh mozzarella. And then layer! Eggplant, cheese, sauce, until you run out of room in your pan. Sprinkle a layer of parmesan on the top.

Bake it longer than you would normally bake fried eggplant, like 40 minutes at 350, covered for 3/4 of the time.

Take out and eat! We had plain sautéed spinach as a side.

It was good. And not so bad for you!

Hannibal’s favorite

22 Jun
I got fresh fava beans this week. Hannibal Lecter likes to eat his with liver and a nice Chianti, but frankly I can’t stand the consistency of organ meat, so we settled instead on red snapper, which I’ll explain below.
Turns out, fava beans are a lot of work for little yield. You have to remove the beans from the pod, then on remove the beans from a little white sheath. We had a big handful and ended up with just a tiny amount.
  
The beans are tough, so my mom suggested to first blanche them, which essentially means to drop them into hot water with salt just before it boils, then leave them in about 2-5 minutes, until the beans turn bright green, then drain them and shock them in a bowl of cold water. This method works well on just about any green veg, and you can leave them in a little longer if you want a more cooked vegetable with a retained crunch.
I didn’t end up with a lot of beans so I also blanched some fresh English peas I had lying around. Meanwhile, I heated up 2 tablespoons of olive oil and 2 cloves fresh garlic, diced, and sautéed the favas for a few minutes until they were on the crunchy side, then I threw in the peas right at the end to warm them.
It also happens to be fresh fig season, which I’ll write about in more detail later. But I had a package going bad in my fridge, so I chopped them up and threw them on top of a filet of red snapper that had been smeared with a table spoon of olive oil, salt and pepper. I broiled it for about 10-15 minutes, then squeezed on some fresh lemon.
Not bad, and also not criminal. Andrew did bring Chianti home for dinner, though. Clariiiiicceeeeee ….

Adventures in CSA: Kohlrabi

3 Jun

My friend Jenna and I are splitting a share this summer of what’s known in New York as “CSA.” It stands for community-supported agriculture, and I’d never heard of it before moving here so forgive me if I’m explaining something that everyone already knows. You pay up front and then get 25 weeks of surprise vegetables and 22 weeks of fruit delivered to a spot near you from farms upstate.

In Brooklyn there is no shortage of organic, farm-fresh vegetables. Or really of anything artisanal or niche (New York Magazine said with its usual snark that it’s a borough pretending it’s a 19th century English village, and that pretty much nailed it.) But the benefit of the CSA is the surprise factor. At a farmer’s market, you’re still going to step away from the strange-looking root and choose a more familiar edible. With CSA you have no choice.

Which brings me to kohlrabi

.

Jenna picked up the batch this week and was so excited about this root vegetable I’d never heard of that she traded for two so we could each have a bunch. I called my mom, but shockingly, she was little help. The only thing she said was: “I like it, therefore you should, too.” Oh, and she told me to peel it.

To end the suspense, it tastes sort of like a mild broccoli with the consistency in-between a turnip and a crisp apple.

Thanks to the delivery this week I also had a giant head of napa cabbage. So here’s what I did with this mystery veg: I made a light summer slaw.

I cut off the green so it resembled an apple, peeled.

I shredded the cabbage, then I used a cheese grater (because I have a small kitchen and lack other more precious kitchen utensils, and frankly they’re expensive and not worth it) to grate three carrots, the three heads of kohlrabi, and one gala apple, peeled. I tossed them all together in a bowl with some freshly, thinly sliced scallion, and then I made a slaw dressing variation I think I already talked about here so forgive me for repetition but it was relevant in this case.


If you need a crash course on the dressing it is:

Approximately:

3 tablespoons thick, plain yogurt, or mayo

3 tablespoons whole-seed mustard

3 tablespoons white wine vinegar

Salt and pepper.

Whip with fork until creamy and sort of runny. I tossed it over the mix and I had the most delightful, light, crisp slaw ever. I served it with sautéed shrimp.

Oh, as an aside, we also at the leafy green tips, first steamed then sautéed with olive oil. They were hearty, sort of like an edible construction paper, maybe they’re not ideal as a leafy green, but they tasted good to me.

So here’s to strange summer vegetables and summer in general, huh?

Unusual vegetables Part II: Fiddlehead Ferns

27 Apr

I’m in a food rut. Lucky for me, it’s early spring and there are a host of vegetables I don’t often cook. Fiddlehead ferns, for one. They’re the windy green stalks of a fern that haven’t yet grown. They’re high in iron, fibre and deliciousness as long as you’re not afraid of them. Mom says to steam them first, for a few minutes to soften them.  I don’t have a double boiler so instead I just stick a strainer on top of a pot of boiling water, works just fine.  I steamed them about five minutes. They got a little brown in color.

Then, I added 2 cloves of minced garlic, salt, pepper and olive oil to a pan, and turned the heat on high, and sautéed them, adding about 1/4 a cup of chicken broth to soften further and add flavor. You can eat them alone, but I served them with patty-pan squash, which  has a sweeter taste, to offset the bitter, earthiness of the ferns.  I cooked the squash in the same mixture, just tossed them in first and then let the ferns cook. The squash took about 15 minutes, the ferns 10. They were still crunchy, which is how I like them.

I served the vegetables with Israeli couscous and broiled sea bass. The whole meal took 35 minutes to cook.

Chicken lasagna: A colossal pain, but worth it in the end

12 Feb

So it seems like whenever friends have a baby, I make them my mom’s chicken lasagna. I’m sorry for everyone who lives not within drop-off distance. I think the reason is two-fold. One, lasagna is easy to cook and freezes nicely and feeds you for many days so it seems like a smart thing to give to sleep-deprived new families, and two, it’s a giant pain in the ass to make so I need a good excuse.

But just because it’s a pain does not mean you shouldn’t try it when you have time. It’s delicious! It’s lighter than traditional lasagna and the bell pepper sauce is a nice difference. I’ve found if you do some things ahead of time, like make the bell pepper sauce the night before or cook the chicken, it will seem like less work.

For one pan of lasagna, you will need:

Bell pepper sauce:

2 large cans of whole, peeled tomatoes

1 regular can of crushed tomatoes

1 large onion

1 bunch flat parsley, chopped

2 large red peppers, or 4 small

2 large yellow peppers, or 4 small

4 cloves garlic

Chicken sauce:

1 pound boneless, skinless chicken breasts

1 stick butter

4 cups chicken broth (maybe more, buy two large containers if you’re not making your own)

3 cloves garlic

2 cups or so of flour

Plus mozzarella cheese, about 1 pound, shredded

1 pound of lasagna noodles

First, put the oven on to 350 degrees and cook the chicken breast on a cookie sheet with olive oil, salt and pepper. It’s boring but that’s not the point. They need about 35 minutes to cook fully. Take them out and let them cool.

Bell pepper sauce:

Julienne the peppers, chop the parsley and mince the garlic.

In a large sauce pan on medium heat, sautee the peppers and onion and garlic with olive oil and throw in some chopped parsley. The peppers will reduce down significantly, and there may be some water in the pot. If so, drain the peppers then go to the next step.

Smush the whole peeled in your hands and add them to the sauce.

Put the small can of tomato puree in there as well and let it simmer for at least a half hour.

While it’s cooking, put salted water on to cook the lasagna. When it’s cooked, douse it in cold water to stop the cooking process and coat it with olive oil to stop it from sticking together. Set aside.

The cream sauce:

It’s not really a cream sauce. Rather, it’s a rue that you thin with chicken broth and added cooked chicken breast.  So to make the rue you need butter, garlic and flour. (A traditional rue is just butter and flour but we want garlic to flavor the sauce.)

Melt the butter on low with the garlic. Then you want to add flour until the mixture is dry, like a dough almost.

Looks something like this:

Once you make the rue you can keep and use it to thicken other things, just FYI. So now check your bell pepper sauce, if it’s thickened and cohesive, turn it off but you can keep cooking it until you’re ready to assemble the lasagna.

Dice the chicken. The smaller the chicken the better it works.

Now you’re going to thin out the rue, which you do by adding chicken broth and whisking whisking whisking. This process is labor intensive, and requires concentration.You have to do it on low heat. Whisk and then let it bubble and then whisk some more. Keep whisking until it has the consistency of Alfredo sauce.

For example, this is too thick still:

This is about what it’s supposed to look like:

So then, add the diced chicken to this sauce.

Now you’re ready to assemble. Line the pan with lasagna noodles, then the chicken sauce, then mozarella cheese and the bell pepper sauce. Repeat as much as you can. Be sure to finish it with a layer of cheese! Stick it in the freezer, bake it for 45 minutes at 350, or give it to friends.

Don’t be afraid of mustard greens

5 Dec

I love kale. Spinach, broccoli, collard greens and all manner of lettuce. But for some reason mustard greens scare me. I think it’s because they are so bitter, or they seem so … wild that I’m never quite sure how to cook them. But today, as we were wandering around the neighborhood farmer’s market, Andrew tasted a sample and decided he wanted some. They looked so pretty, all purple-tinged and fresh. So we bought them. And lo and behold, they’re delicious! And easy! Peppery, bitter and fresh. How did I ever not cook them?

Mom’s in California this weekend visiting Bob’s daughters, so I had to track her down on one of their phones. “They r like any other BITTER greens,” she typed on some random number. Which means, they’re easy to cook.

You need:

1 bunch mustard greens

salt

pepper

olive oil

Cut the bottom stems off so they’re just leafy. The key here is to blanche them first. If you’re not familiar with how to blanche, it’s really quite easy. Fill a saute pan with water almost to the top and right before it boils, toss the greens in. Looks sort of like this, forgive the photos I have an older smartphone.

Let it sit in the near-boiling water for about 5 minutes or until they’re a bit soft. Then take them out and set them aside, briefly. Dump out the water.

OK so, if you’re cooking something else, like pork tenderloin which would be great, or fish or something, (we had shrimp, again, I’m on a shellfish kick) Let these greens hang out until about 10 minutes before everything else is done.

Pour a thin layer of olive oil into the saute pan and heat it up. Toss the greens back in for about 5 minutes. Salt and pepper them.

And seriously, that’s all my mom told me to do. Well, she said I could add bacon if I wanted to but that’s another story.

Go buy some! They’re tasty.